New Behavior System


I'm not a clip chart fan.

Not because I don't like the clip chart...but because what I have been using for the last 10 years has worked for me.

BUT, at my new school, the whole school has to use clip charts.

OK.

I had to concede to this new way. (don't yell at me Teeny!)

I was racking and racking my brain.... I've been doing that a lot lately. I had to do that with my book levels too! Man, my brain is SO tired. lol.

I finally came up with something. It's a mixture of the clip chart, my old ways, and Teeny's ideas. This was the first week that I fully implemented it, so I feel comfortable sharing with you now.

'Cause you know.. I don't want to show you things that I end up not liking - ha!

So, here is my NEW behavior plan. 


I really didn't like having the big clip chart in the front of the room for everyone to see. That's just me though. Don't start yelling at me. lol

BUT, luckily, one f my fave girls, Rachelle, had just posted her personal clip chart pack!  So I immediately scooped it up and started printing, gluing, laminating, and cutting!


I was going to have them keep it in their desk pocket, but then I got the desk park thingies that Teeny kept taunting me with, and the fit perfectly in there behind their name tag. AND the little clothespin can also clip it to their name tag, which holds it up. This is great because 
first - they can't lose it
and second - I can quickly see where everyone is on their colors as I walk around.


Ok, so HOW IN THE WORLD was I going to make this work in my room?? Well, I'm kind of doing a mix of the clip chart and my old way... AND a little bit... ok, a lot of Teeny mixed in!

I will get into my way in a little bit. First up... Teeny's contribution.

What you see in the picture (below) are some green tags and a mystery person card. 

Well, for every day that the kids land on a green, blue, or purple they get a green tag. These green tags are just green cardstock that I laminated....I used the good cardstock, not construction paper and I used my good laminating, not the school laminating. I want these suckers to last all year! lol

I had the brilliant idea of making blue and purple tags and making them count for more "tabs" (don't worry...I'll get to that later). So green would be 1 tab, blue would be 2 tabs, and purple would be 3 tabs... BUT I think I was still in my 2nd grade mind...I don't think my little firsties would be able to handle that just yet.

Ok. So for every day they END their day on a green, blue or purple, they get a a green tag. Teeny calls them golden tags, but since I'm using a clip chart, I figured I'd better stick with the whole color thing.

AND if they are the Mystery Person for the day, and they ended their day on green, they get ANOTHER green tag. The Mystery person came from Teeny too.


They keep their green tags for the week in their desk pocket with their team job card.


Then, this is where I veer away from Teeny (bye, friend!) and go back to my old ways.

On Friday, we count how many green TAGS they have...that's how many green TABS they get. I know, I really have to enunciate the taGs and taBs. It's confusing.

They write their number on the green tabs.


ALL the green tabs go in the bucket...and then I pull out 5 tabs (well, 5 students...Sometimes the same number gets pulled out more than once, but they don't get another prize).


What's the prize??

A prize from the Prize Pass catalog that I got from Christie a few years ago. She has it as a freebie on her blog! I've had it in the same folder for 3 years now. I love it! I just need to print off a few prize passes every so often because some of my little friends like to lose the passes or somehow dowse them in water or something. lol. Whatever, that's a cheap replacement.


I really don't like the treasure chest idea because I don't like having to buy things for it all the time... so this is like THE perfect solution!


Ok, so talking with my teammate the other day...she does the money system... where you earn money for your clip chart behavior.

Well, we came up with the brilliant idea of placing a price tag on the prize pass catalog! You can get those little price stickers from Wal-Mart or whereever and stick them in the corner of the page so the kids know how much each prize is worth.

SO if you wanted to do Show and Share, that'd be 40 cents...or Stinky Feet?? That'd be 30 cents. So you can still incorporate it in so many different ways.

So even though I have to use the clip chart, I've made it my own...so it doesn't really feel like I'm using the clip chart. haha.


8

Pete the Cat

This week was our Pete the Cat week.


I LOVE Pete the Cat.

So does about every child.

How could you not??

I did it last year with my 2nd graders... check out my Visual Post on it HERE.

We started with Rocking in my School Shoes, then moved to I Love my White Shoes, and then to My Four Groovy Buttons (which was great for math - and Autumn's personal favorite!)  Here are some of my other favorite Pete books...


I'm sure you know already know, but you can go to the Harper Collins website and listen to all the Pete the Cat books on there for free!


This was the graphic organizer we did for the Groovy Buttons book.  I really like to make "shorthand" pictures as we always do graphic organizers because so many kids are visual... so they can put a picture with the word. In fact, I used to have book marks for when we "marked our books" during guided reading and such that had these symbols on them.


We also did our Pete Tree Map for the "I Love My White Shoes" book, which I forgot to take pictures of, but it was "Pete - has, is , and likes" and then we wrote our sentences using the tree map...and we added OUR own sentence. We were really working on the work "like" since it was one of our sight words, so I tried to encourage them to use that in their final writing...letting them "highlight it" if they used it. Hey... it's a bribe that sometimes works. ha!


After they finished their neat copy of their writing, they got to make their Pete the Cat craft.  Last year, I did the craft as a "Following Directions" center, but I knew there was no way my 1st graders could do it independently....well, some could...so we did it whole group. 


I didn't have any navy paper, so I let them choose between the blue or the black.


I think they came out so cute! They did ALL the tracing and cutting themselves... and they even made their own whiskers, eyes, and noses.  I LOVE them! True kid art...hehe.


We were really focusing on handwriting and complete sentences with punctuation and capital letters... 2nd week of school stuff, right?


We also did a fun activity where they put the events in order from "Rockin' in My School Shoes." They had to put the events in order and label them...


There are labels in the pack that you can print up for them to read and glue with the pictures, but I wanted them to work on more handwriting skills... so I made them write them out! haha...I'm so mean.


There are TONS more activities that I didn't get to this week, but I posted about them LAST year with my 2nd graders. You can see more activities in THIS post, which is also my post about how I run my small groups. Take a look - LOTS of good information!

Also, I announced it on my Facebook page, but if you already own my "Groovy Cat" pack, go download it again, I added about 15 more pages to it!  Click the pictures to check it out!


Happy Friday! I know I'm thankful for a 3-day weekend! Woo!


3

Book Leveling - Freebie Labels

When I moved to my new school, I was informed that they don't do A.R.

I was bummed.  I love A.R. I have been doing A.R. for the last 10 years.

This school does Fountas & Pinnell.

It's only a K-2 school, so I get why they don't do A.R.

But still. When I heard that, I'm pretty sure my eyes bulged out and my jaw dropped. If you've seen pictures of my extensive classroom library, you can probably understand why I was kind of freaking out about leveling my whole library....again.... for the THIRD time. 

So I racked my brain and tried to come up with a "simple" way to do it. 

You know that I'm quite OCD (LABEL IT ALL!), so there had to be a system. I didn't want my bins organized by levels because I like the kids to look through my books as they would a real library. PLUS I already have them beautifully organized.

So I came up with a system.

Here's what I came up with.

I made labels and printed them on the Avery mailing labels


I made it so that TWO labels print up on each ONE label...so I'm getting double my bang for my buck. When I cut the labels in half, the fit perfectly around the bind, with the letters showing on the front.

And then I had a WONDERFUL parent volunteer come in and do all of my books. Let me tell you, after 3 days of 4-5 hours of leveling and labeling, she's about halfway finished. Seriously. She's amazing. I need to give her a major gift afterwards.

For real.

She's sitting outside my door in the hallway (using the extra desks of kids that didn't show up because I don't' have any room in my actual room for her to sit) looking books up on the Scholastic Book Wizard website/app and labeling them. I feel very blessed to have her.


And now my books are labeled so beautifully!


So did you see the other labels on my books?? Yep. My books are now leveled three times....

One for A.R.
One for 100 Book Challenge (do any of you do that!?)
And now one for F & P.

Hopefully, since these all have letters on them, my kids won't get confused easily! ha!


Anyway,  if you want them, you can grab them for free from my store.


Tomorrow is Friday.

It's a 3-day weekend.

I'm sure you know where I'll be!


14

First Week of Centers - How We Do Them

Last week, I showed you my plan for centers.

In the midst of our first week, I decided to introduced centers to my kids.

I know. I'm crazy. But I wanted to get them started so I could do my assessments starting the next week.

I was expecting total chaos.

But I was pleasantly surprised. It went pretty well! The first day I had to just keep walking around making sure that everyone went to where tehy were supposed to go, doing what they were supposed to be doing, all the fun stuff.

The 2nd day went much better.

The 3rd day? I was able to actually sit and start assessing some kids!

Are we doing them full-blown yet? No. But we are off to a great start!

Here's how it went.

I taught them how to pick centers. That was like a 30 minute session. THEN, I walked each one through the process AND then I walked around to make sure they wrote the date on the correct center. So the whole process took about 45-60 minutes.

Here is how they picked their centers. They put their number cards next to the center number. Right now I'm only allowing up to 2 people to a center. BUT, eventually, we'll be doing 2 centers each day (they will have a green number card to show the 2nd center they choose), but right now, we're just working on one center a day.

Sorry about the lighting... the pocket chart is in a corner with bad lighting!


I gave them their seatwork (right now it was just the activities from my First Days of First Grade Freebie).


After they filed their seatwork, they were allowed to get their buckets for the their centers.  This set up looks a little different now (I've changed it up after we started using it), but the buckets are the ones on the bottom. they correspond with the center numbers in the pocket chart.  When they are ready, they grab their bucket and head to a spot in the room to do their center. Eventually, their partner will meet up with them and they can work together. 


Here they are at work at a few of our centers.

Poetry center.


Reading the clues.


Sentence scrambles.

Pocket chart center.


Sight word play-doh (a quick favorite!)


Um....I was SUPER impressed with one of my girls who loves to use resources already! I passed out their Spelling Journals last week and explained how to use them because this week we're going to dive into them. so when she didn't know how to spell a word, she got out her journal! Say what!?


Following directions center to make a book.


The centers this first time takes a LOT longer than they should... and they probably will for a while, which is why I'm only doing 1 center a day instead of 2 centers a day. 

When my timer goes off (yes, I have a timer set, otherwise I would go FOREVER!)  It's the best timer in the world. I got it when I took a training over the summer. It's the Kagan Mega Timer. Best thing EVER. Not only is it a timer, but it's also a team selector, student selector, stop watch....the list goes on! AND it gives warnings when time is almost up. 


Anyway, sorry, I get side tracked easily.

The timer goes off, and they clean up their centers and return their buckets. They go to their seats and put their menu on their desk and if their center had a paper to go with it, they put that out too. I come around and check off their centers. If they finished it (most of it) and did it correctly with their best efforts, they get a star, sticker, whatever. If they didn't? I circle the box where it says T.S. (teacher signature). They will keep them all in their centers folder until we are done with the round, and then I'll staple them all together and send it home. This is the same format I've use in 2nd and 3rd grade too; it just works for me! But I've even had a Kinder teacher friend adapt this format for her classroom (I'm pretty sure using pictures instead of words).


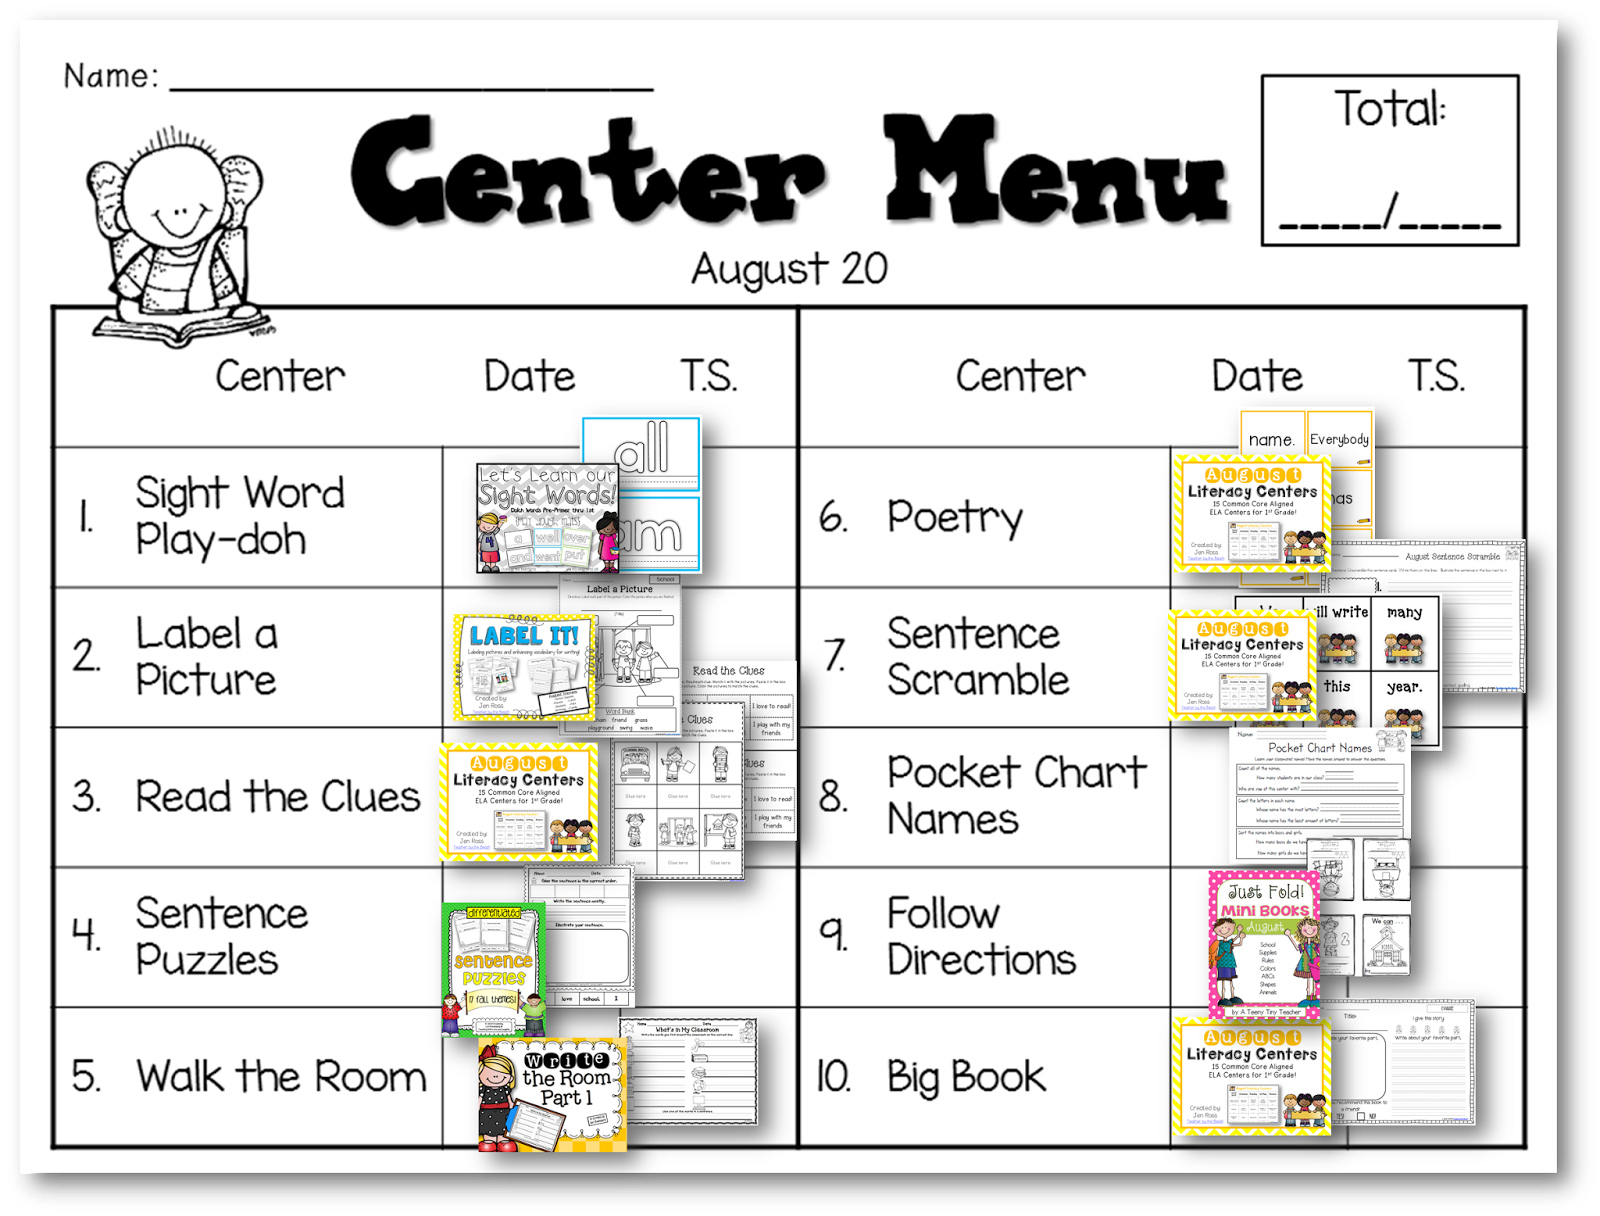
I didn't get a picture of all the centers they were doing this week, so here is my "visual plan" for centers.


And the links of where to find them all....

2.  Label a Picture (these come from my Label It! pack and my August Center Menu for 1st grade)
3. Read the Clues from my August Centers
4. Lori's Sentence Puzzles
5. Lori's Walk the Room
6. Poetry Center from my August Centers
7. Sentence Scramble from my August Centers. I'm only using 3 of the 6 sentences, and the other 3 will be next round of centers.
8. Pocket Chart Names. This is a center I just came up with. I wanted them to get to know their classmates' names, so maybe this will help? It's a freebie if you want it. Click {HERE}
9. Follow the Directions - I wrote steps of directions on sentences strips, and I'm using Teeny's Back to School Foldable Books
10. Big Book - writing an evaluation on the book from my August Centers.


I hope you are enjoying your weekend - especially if it's the first weekend of back to school for you! I now must go finish my plans for this week.... figure out how to teach 1st grade - ha!


16
Back to Top